Template: Airport transportation booking form
Form Demo
Template Description
Key Features
The transportation booking form has these key features
- Users can pick from a list of airports
- Use Google Maps to calculate the distance between the airport and the destination and calculate a price.
- Users can select One Way Trip or Round Trip.
- The user can select multiple transportation types (like sedan/SUV/bus). Each transportation type has a different price per kilometer, Starting Fare, and a maximum number of passengers.
- Users can select if they need child seats. Each child seat adds a $3.00 fee.
- The transportation booking form validates that the number of passengers is not bigger than the maximum number of passengers the selected transportation type can support.
- Each transportation type shows the trip price. This trip price is calculated using the cost per kilometer and starting fare of each transportation. It changes automatically depending on the user's pick-up and destination address.
How I created this form
In this section, I am going to cover how I did this form in case you have doubts or want to learn but if you just want the result and don't care about this go to the "Template Download" section to get this template.
Prerequisites
- AIO Forms, you can download the plugin for free here.
- (Kind of optional) Essentials Add-On For the transportation type field I used a 'Custom Dropdown' field which is available in the essentials add-on. If you want to stick with the free version you can replace that with a standard dropdown. It won't look this nice but it will be 100% functional.
Getting Started
Creating the personal information section
The first section of my transportation booking form contains the "Personal Information" fields. This part doesn't have much science, I just added a "Name", "Email" and "Masked(Phone)" field, and made them required.

And that's it, nothing fancy. All the interesting stuff comes from the "Trip Information" section.
Creating the trip information section
In this form, the client selects an airport and destination address. For the airport list, I used an 'Autocomplete' field and added the Airports I wanted my form to use.

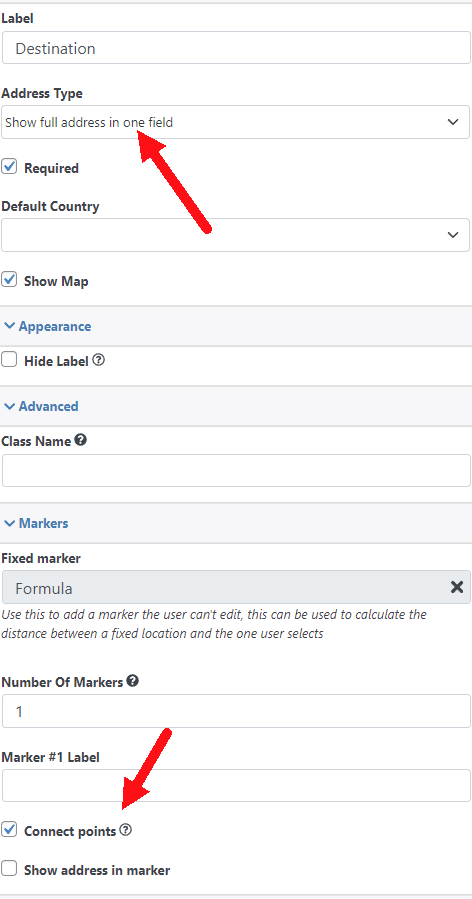
For the destination field, I used a Google Maps field. In this form, I want to show an 'Address' box (where the users will input the destination address) and I want Google Maps to show the route. To do that I configured my field to 'Show the full address in one field'. I also configured it to connect points.
Linking Google Maps with the airport field
This form needs to calculate the distance between the selected airport and the destination address. To accomplish this I need to do two more things.
- Save the address of each airport somewhere.
- Make my Google Maps field calculate the distance between the selected airport and the destination
1. Saving the airport address
This part is very easy. For this, I just need to go to my airport field and click on 'Add Additional Column'
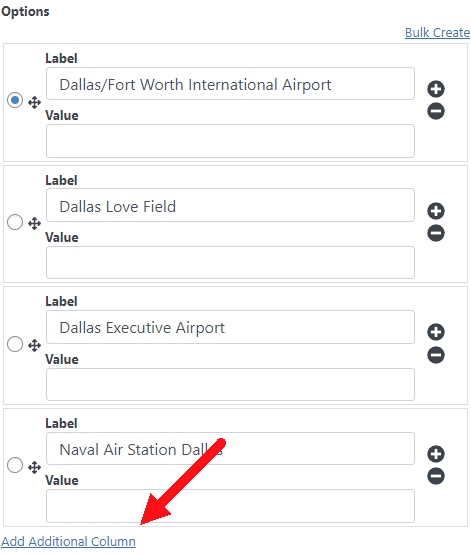
The name of this new column is going to be 'Address'
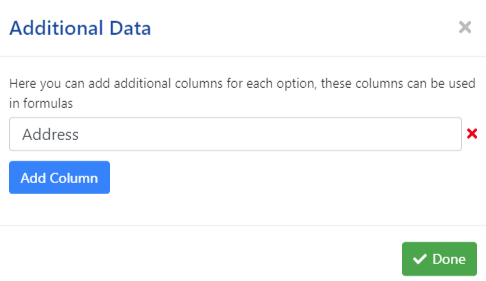
Creating the address column
Then I just need to input the address of each field in this new section
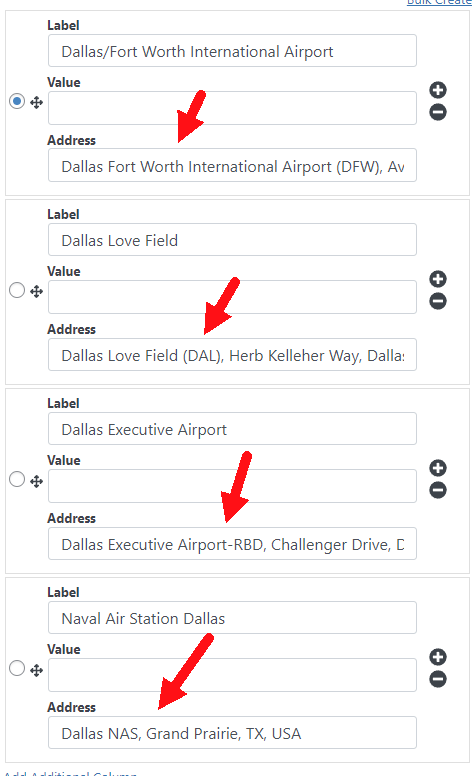
And that's it now my address is saved.
Note: I could also save the address in the 'Value' section. But that section is generally used to save the price of each option so I opted to create a new column instead.
2.- Linking my Google map field with my address field.
So far, my Google Maps field doesn't know my Airport field. This means it only knows the address that the user inputs and can't calculate the distance between anything.
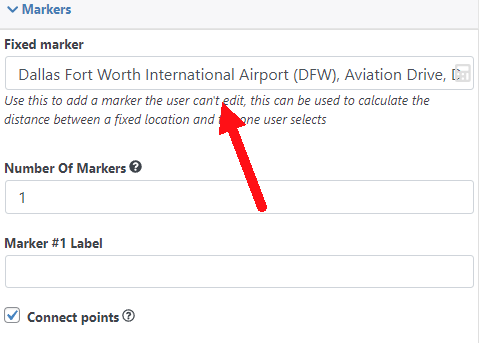
To make my Google Map field calculate the distance between a fixed position (the airport address) and the address the user inputs I can use the 'Fixed Marker' setting. This setting will make the plugin calculate the distance between an address that you define while designing the transportation booking form and the address that the user inputs.
For example, this configuration would make the plugin calculate the distance between "Dallas Fort Worth International Airport (DFW), Aviation Drive, Dallas, TX, USA" and any address that the user inputs.
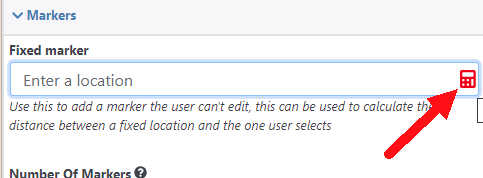
This configuration is more than enough if you just have one fixed address. But in my case, I have a list of airports and I want my form to use the address of the selected airport.
So to do this I will click on the 'Calculator' icon to define a formula.
The formula that I am going to use is pretty easy:

This formula just tells the plugin to look at the Airport field and get the value from the 'Address' column (the column that I created in the previous step)
With this, my Google Maps is now linked with my address field and is ready to calculate the distance.
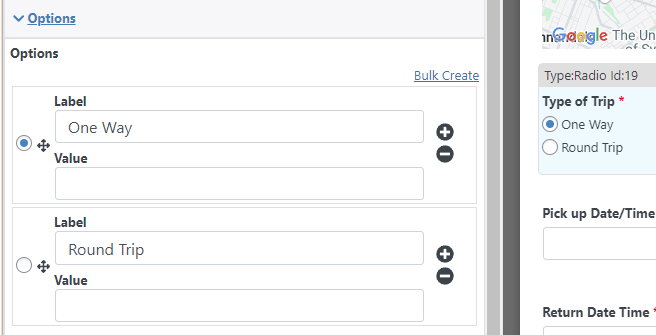
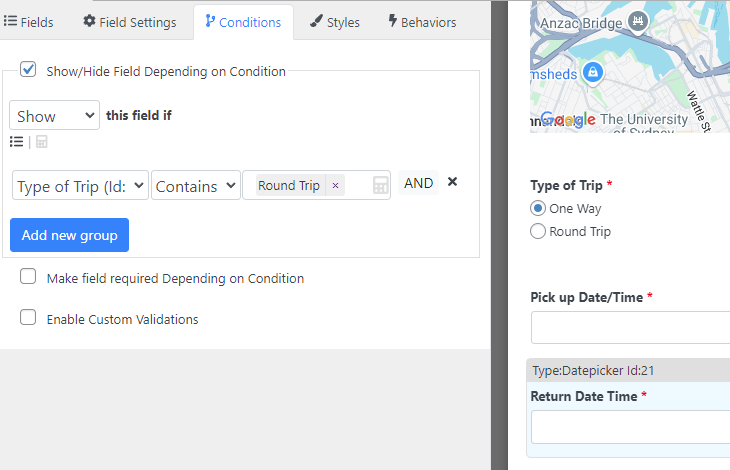
Supporting one-way and round-trips
This section also doesn't have much science, for this, I just added a Radio Button field with the one-way and round-trip options.
This field will be used later to calculate the price.
Adding the pick-up date and return date
The next two fields are also pretty straightforward, they are two date time fields with the 'Add time picker' box checked
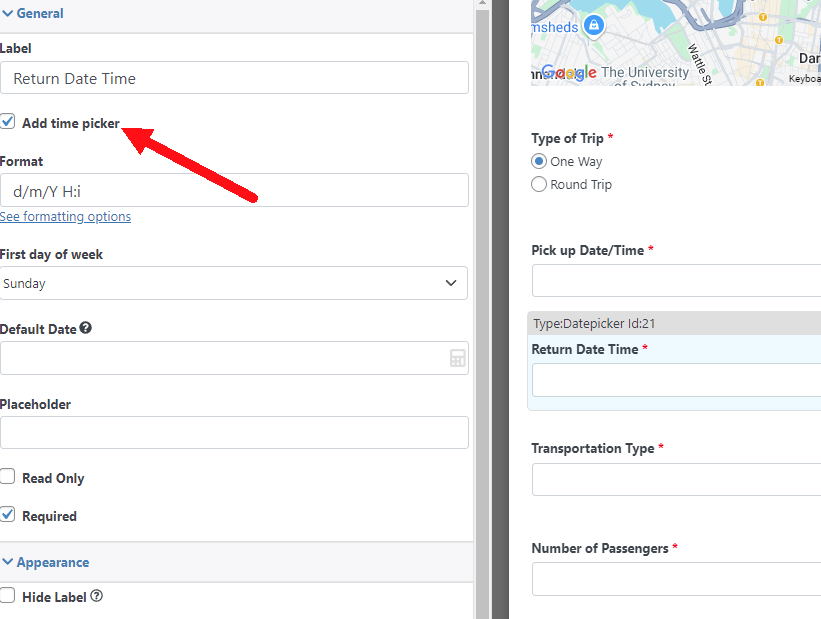
The 'Return' date time field should only be visible if the user selected 'Round Trip' though so to do that I just added a 'Show/Hide' condition.
Also, the return date time field should never be earlier than the pickup date so to do that I went to the 'Minimum Date' setting of my 'Return Date Time' field and clicked on the formula icon.
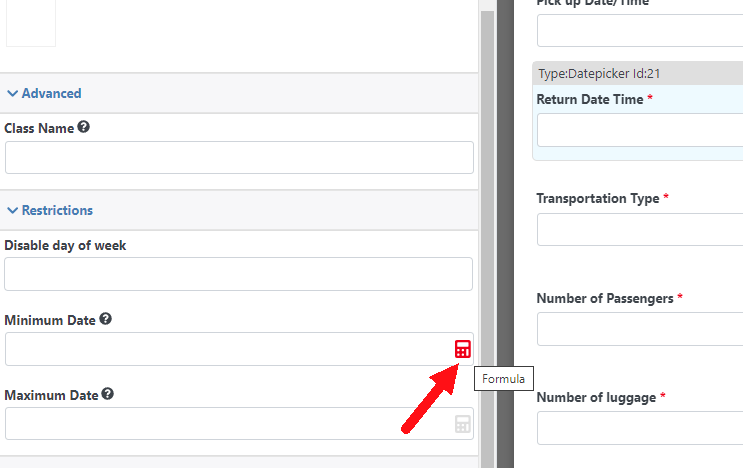
And my formula is just the 'Pick up Date/Time'

Creating the transportation type field
This is the most complex (but also coolest) field in the transportation booking form, this field has many things going on with it.
- It displays an image of the transportation type.
- It displays the total cost of picking this kind of transportation (it takes into account the transportation distance and whether it is going to be a round or one-way trip).
- It displays the maximum number of persons for each transportation type
Setting up the transportation type field
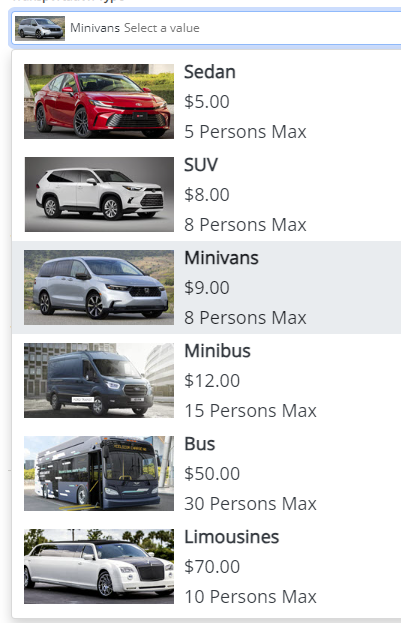
I want to show a transportation thumbnail and display each piece of information (Like the total price and the maximum number of passengers) nicely so I am going to use a custom dropdown for this.
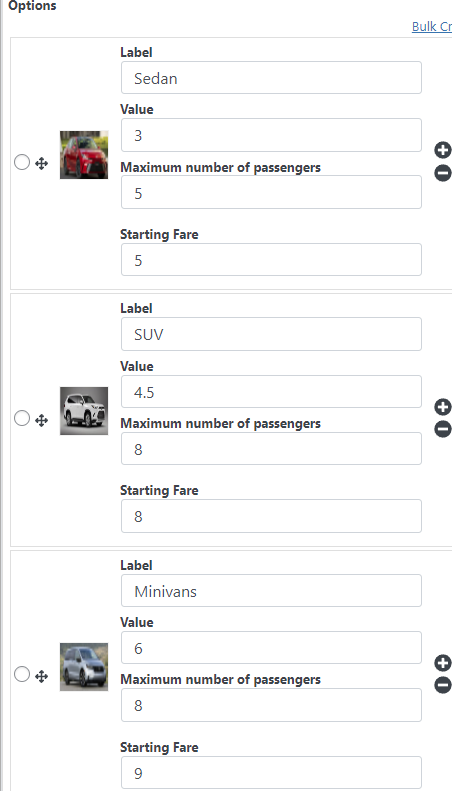
Each transportation type has a different price per kilometer, starting fare, and maximum number of passengers, so I am going to use additional columns again to save each piece of information. After setting it up my custom dropdown options look like this ( I use the value section to save the price per kilometer)
Now to format the layout of the options I am going to go to the 'label format' setting and format it as I want it. My layout format looks like this:
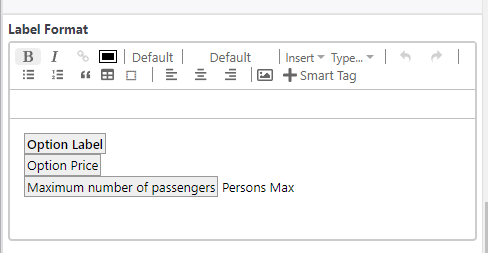
Wich in the transportation booking form looks like this:

Showing the total price for each option
Currently, each transportation type would show the price per kilometer but I don't want that, I want it to show the total price which should be calculated like this:
TripDistance(in kilometers) * Price per kilometer + Starting FeeAlso if the user selects "Round Trip" I need to multiply this price by 2
To do this I will go to the 'Pricing' section of my custom dropdown and select 'Formula per item' as my price type.

This formula will let me use a formula to calculate the price of each option.
Now this is the formula that I am going to use
This formula might look scary at the beginning but it is very straightforward once you understand each element of it:

This section first uses the method 'GetDistance()' of the 'Destination' field (the Google Maps field) to get the trip distance in meters, then it divides it by 1000 to get the distance in kilometers. Then it multiplies the result by the option price (which is the price per kilometer) and lastly, it adds up the starting fare.
The result of all this operation is saved in a variable called 'tripPrice'.
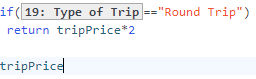
The next thing my formula does is check if the user selected 'Round Trip'. If it does it multiplies the trip price by 2. Otherwise, it just uses the trip price as it is (without multiplying it).
And that's it! Now my custom dropdown (and the most complex field of this form) is ready. Now I just need to set up the remaining fields.
Setting up the Number of Passengers
This field is just a number field that is required. Also, I want to make sure the number of passengers traveling is never bigger than the maximum capacity of the selected transportation type. To do so I will go to the 'Maximum Value' of this field and add a formula.
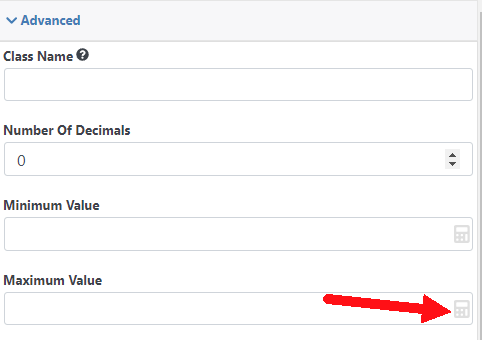
The formula is pretty easy, it is just the value saved in the "Maximum number of passengers" section of my "Transportation Type" field.

Adding the Number of luggage and "Will you require a child seat?" fields
These fields have nothing special they are just a number field and a radio button

Adding the How many child seats field
This is another required number field

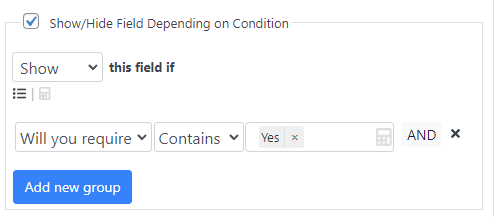
I want this field to be shown only if the user needs child seats so I will add a 'Show/Hide' condition for this.
Adding a fee for each child seat
This field needs to add a $3.00 fee ($6.00 in a round trip) for each seat. To do that I will go to the 'Price Type' setting of this field and I am going to select 'Formula'. My formula will look like this:
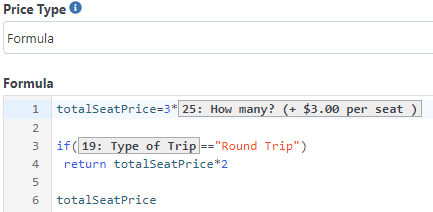
This formula will first multiply the number of child seats selected by 3 and will save the result of this operation in the variable called 'totalSeatPrice'
Then the formula will check if the user selected 'Round Trip' if it does it will multiply the totalSeatPrice by 2. Otherwise, it will just use the totalSeatPrice without any multiplication.
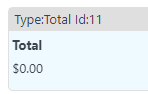
Displaying the grand total
Lastly (finally!) I want to display the grand total at the end. To do so I will add a 'Total' field.
And that's it! Now my form is ready to go.
Conclusion after finishing the transportation booking form
This form does very complex stuff. Generally, to do something like this you would need a specialized plugin or some deep coding experience but as you can see with AIO Forms that's not needed, you just need to understand how to set up conditions and formulas, and after understanding that the sky is the limit!
Template Download
Installation Instructions
You can download the template directly from here clicking in the button above and then import it to all in one forms
You don't have All in one forms?
You can get it HERE (there is a free version!)
Didn't fine the template that you need?
Sorry for that, our template gallery is pretty small right now but we are adding more templates constantly, remember that all the templates are 100% customizable so you could tweak one template to match your needs (everything is customizable using our drag and drop builder, no coding experience needed) or you can suggest one template in the Support portal