Do you want to create coupons and discounts in your form? The order forms can apply discounts in several different ways, maybe it is a fixed discount, maybe is % of the total order price or maybe it is a complex discount that applies only when a condition is met (like only to a specific product, when a coupon is submitted or when certain users are doing the purchase).
It doesn’t matter what kind of discount you want to give. In this tutorial, you will learn everything about discounts and how to apply them in AIO forms.
Introducing Discount Field
Although not 100% needed (you could do something similar using formulas), the discount field lets you create coupons and discounts for your forms in a very easy (yet very customizable) way. This field is part of the Essentials Add-On. You will also need the free AIO Forms plugin.

Creating Fixed and Percentage Discounts
This field has two main settings “Discount Type” and “Value”
- Discount Type: Here you can define what kind of discount you want to give, there are two options “Percentage” (to give a discount relative to the form price) and “Fixed” (to give a fixed amount)
- Value: Here you can define the value of the discount, so if you put a 30 here and select a “Fixed” discount type this field will give a $30.00 discount, or if you select “Percentage” it will give a 30% discount.
This field supports formulas so you can create very complex discounts based on other fields or the user that is filling up the form. More about this later.
Formatting the discount
Another important setting is the “Text” setting, in here you can configure how you want to display the discount to your users, for example, you might want to just display the discount percentage like this:

Or you might want to display both the discount percentage and the amount discounted:

Or even make your own completely customized text

To format the field just edit the content of the “Text” setting as you want it:

Creating Coupons And Discounts Conditionally
Using show/hide condition to apply discounts
As explained above you can easily add a discount by just using the discount field. But the nice thing about the field is that you can create conditional discounts just as easily by using conditional logic. If you hide a discount field using conditional logic the discount won’t be applied.
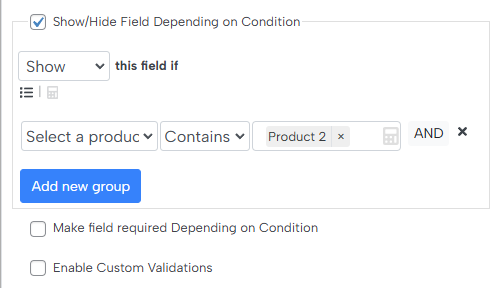
So for example, if I have a dropdown with a list of my products (“Product 1”, “Product 2” and “Product 3”) and I want to give a discount only to “Product 2” I can create a show hide condition like this:
This is the result:
Using multiple discounts
With the previous example, you could conditionally apply a discount which is great. But what if you have multiple discounts and want to apply one or the other conditionally?
Technically you could add various discount fields in your form and use the show/hide condition trick to apply the right one but having to add one field for each discount could quickly become a nightmare to administrate, especially if you have many of them. Thankfully there is a better alternative.
You can use the change discount condition to change the “Discount Type” and “Discount Value” conditionally.
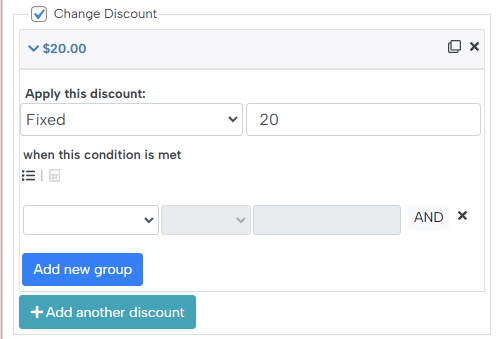
For example, using the previous example let’s say that now I want to give a fixed “$10.00” discount if they select “Product 1” and a 20% discount if they select “Product 2”, to do so I just need to go to the change discount condition and create my conditions like this:
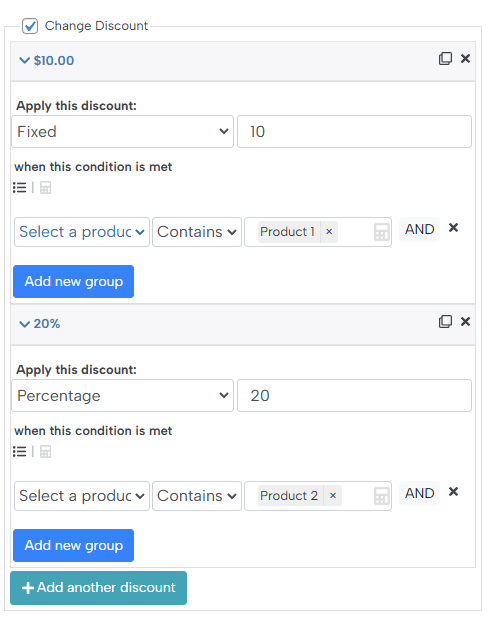
And with that my condition is ready
Creating Coupons
This tutorial is about how to create coupons and discounts, so far I have created discounts but using conditional logic you could also create all the coupons that you want. For example, let’s say that you want to give a 30% discount if the customers use the coupon “30DISCOUNT”.
To do so all you need to do is add a new text field where the user is going to submit the coupon, let’s call this field “Coupon”

And then I just need to create a conditional logic to give a discount depending on the value of this field.

This is the result:
If I want to add more coupons I just need to add more conditions.
Using Formulas
With this field plus the conditional logic, you are probably ready to create any discount you will ever need. But for the most complex discounts you can use formulas to make them happen.
To create a formula you just need to click on the calculator icon in the “Value” setting
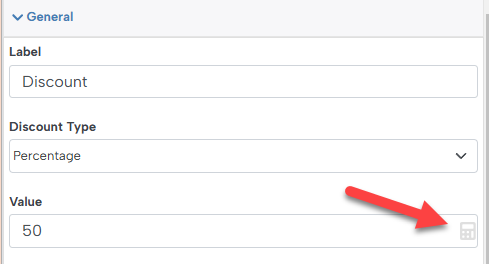
In this tutorial, I am not going to detail how to create formulas as that is already explained in other guides so I will just do an example.
Let’s say you have three fields with prices and you want to give a 10% discount if the amount of those three fields is greater than $100 and a 30% discount if the amount is greater than 150 (this is an example that is is used in this demo form btw)
To do so all you need to do is set up your formula like this:

What this formula does is sum the price of the three fields and then if the total is greater than 150 it returns a 30 (which means the field will give a 30% discount) and if it is greater than 100 it returns a 10 (that’s a 10% discount)
And that’s it, with this configuration your form will work like this (notice how the discount changes as the price of the form changes)
Applying a discount only to a section of your form
You can also apply discounts only to some elements of your form and leave others untouched. For example, let’s say that along with my product, I also want to offer additional services like premium support and priority shipping. But I don’t want to offer any discount for these additional services. I just want to offer a discount for my product.
To do so I just need to place the discount field and the elements I want to receive a discount inside a group panel like this.

This way only the elements inside the group panel will have a discount and my “Additional Service” field (which is outside the group panel) won’t have any discount
Applying different discounts when the user can purchase multiple items
The same trick of the previous section can be applied without any kind of modification. So for example if I put the product dropdown and the discount field inside a repeater field

Now my form will let my users pick multiple products and it will apply the right discount to each of them. All of that without having to do any complex modification. All I needed to do was place them inside a repeater field (I changed the discount field format a little bit to make it look different but this change was not needed)
Conclusion
As I said previously, the discount field is not mandatory. You can do similar stuff using only formulas but it makes applying discounts SO MUCH EASIER especially if you are not tech-savvy or don’t want to deal with long and complex formulas.
